
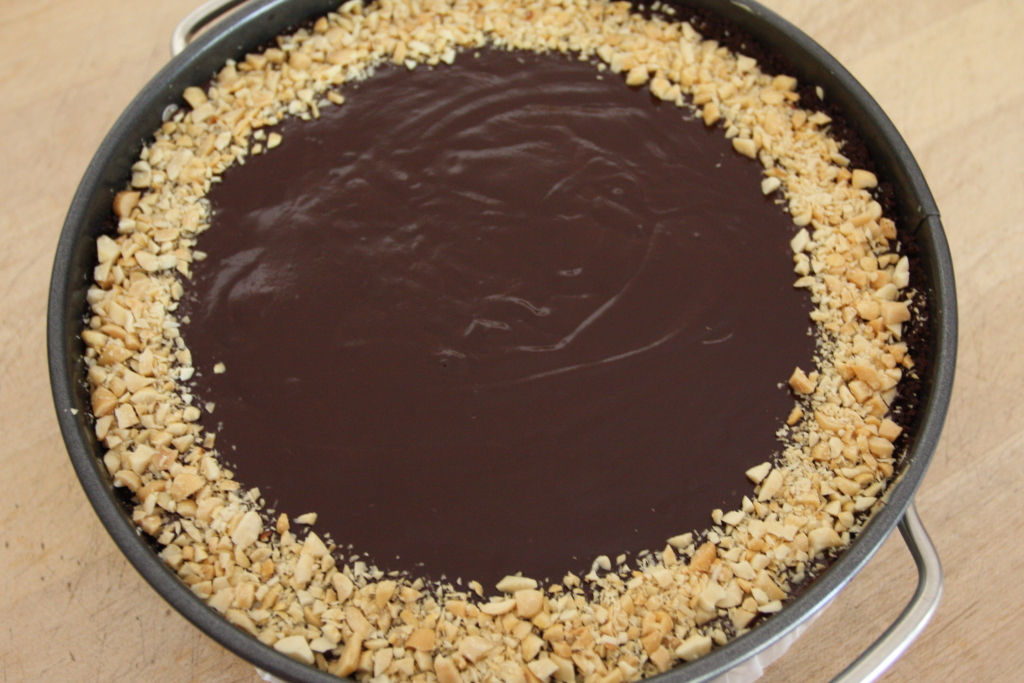
We’ve made this several times, and with care it can look like the photo above. Really!
As I mentioned yesterday, we found that Cup Cafe has one of the best desserts on the planet: Peanut Butter Cheesecake. For about a year we had wanted to figure out how to make it, but just didn’t know how the cafe staff could make it as light and creamy as it is.
As it happens, about three weeks ago, we checked out Baking: From my Home to Yours by Dorie Greenspan (check out her webpage, you can find some really good recipes) from the library. Wow, these recipes looked fabulous, and one of them was Peanut Butter Torte. Well, that’s at least close, but wasn’t quite right. Her recipe had peanut topping and spiced peanuts in the batter. Probably good, but we’re big on texture (tapioca pudding will never be good, nor will rice pudding) so we decided to leave out all the crunchy, lumpy things and go for a smooth, light cheesecake. We offer this variation.
Peanut Butter Cheesecake
Ingredients
Crust:
- 40 Famous Chocolate Wafers crushed in a food processor
- 4 Tbs unsalted butter melted
- Pinch salt
Filling:
- 2 cups heavy cream
- 1/4 cup confectioners’ sugar
- 12 ounces cream cheese room temperature
- 1 cup confectioners’ sugar
- 1 1/2 cup smooth peanut butter room temperature
- 2 Tbs whole milk
Chocolate coating (ganache):
- 4 ounces bittersweet chocolate
- 1/2 cup heavy cream
Instructions
For the Crust
- Place a rack in the center of the oven and preheat to 350°F.
- Crush the cookies.
- Add the salt and use a fork to coat them with butter.
- Press the mixture into a springform pan and/or a parchment lined baking pan, then freeze for 10 minutes.
- Bake for 10 minutes, and remove to cool completely.
To make the filling
- Place the mixer bowl and whisk attachment in the freezer, for at least 30 minutes.
- Whip the 2 cups cream. When the cream is starting to get stiff, add the 1/4 cup of confectioners’ sugar and continue whipping until the cream hold medium stiff peaks.
- Transfer the whipped cream to another bowl and refrigerate.
- Put the cream cheese in the mixer bowl (no need to wash), and with the paddle attachment mix on medium until creamy. Add the 1 cup of confectioners’ sugar and beat until quite creamy and smooth. This will take about 4-5 minutes on medium speed.
- Add the peanut butter and milk.
- Turn the mixer back to medium and work that peanut butter into the cream cheese.
- Use a rubber spatula to fold about 1/4 of the whipped cream into the peanut butter mousse.
- Now fold in the remaining whipped cream, trying to keep the batter as light as possible.
- Scoop the batter into the crust, smooth the top as best you can and refrigerate for at least four hours.
Make the ganache (chocolate coating)
- Place the 4 ounces of chocolate in a heatproof bowl, and microwave at 50% power until it begins to melt.
- Meanwhile, bring the 1/2 cup of cream to a boil in a saucepan.
- Pour the boiling cream into the bowl of chocolate, and stir with a rubber spatula until well mixed and shiny.
- Spread the ganache on the cheesecake as smoothly as you can, and put it back in the fridge to harden.
Ingredients discussion:
The original recipe called for crushed Oreos, and, while we like the cookie part of Oreos, the filling is just plain nasty, so we went with Nabisco Famous Chocolate wafers. Next time, we plan to use home-scratched chocolate wafers, so watch for that recipe. For peanut butter, use one of the national brands, but don’t use the “natural” kind. While we don’t know exactly why, the original recipe does specify the non-natural kind. This leaves out scratchin’ the peanut butter. The cream cheese could be scratched, which we’ll do sometime in the future, just probably not for this recipe. Finally, chocolate for the ganache. Make sure to buy a brand and style that you like. We went with Callebaut 70% cacao bittersweet; it is very good chocolate and if you’re going to make something like this dessert, go all out.
Procedure in detail:
Note: You’ll have to refrigerate this cheesecake for at least 4 hours before applying the chocolate coating, so plan accordingly. We started Saturday evening so we could chill it overnight and have it ready on Sunday.
To make the crust:
Place a rack in the center of the oven and preheat to 350°F.

Crush the cookies. We used a food processor; you could crush ’em in a sealed bag with a rolling pin, but crush ’em to smithereens, or until they are mostly dust.

Add the salt and use a fork to coat them with butter. Ours didn’t get coated very well, which made it difficult to press them into the pan, so next time we’ll up the amount of butter.

Press the mixture into a springform pan and/or a parchment lined baking pan. We used an 8″ round cake pan and a 6″ springform. Partly because that’s what we had, and partly because the smaller torte will be a thank-you gift to our neighbors. For the baking pan, we only pressed the crumbs on the bottom. It was way too difficult to get them to stick on the sides.
Freeze for 10 minutes.Yep, just pop the crust, pan and all, into the freezer to help keep the crust from crumbling during baking.
Bake for 10 minutes. Once baked, place the pans on a rack to cool completely. And turn the oven off; we’re through with it for this dessert.
To make the filling:
Place the mixer bowl and whisk attachment in the freezer. You want them cold enough to make the cream whip up without turning into butter. They should freeze for about 30 minutes.
Whip the 2 cups cream. Start the mixer on a medium-low speed setting, and work your way up to a medium-high setting to prevent a lot of splattering. When the cream is starting to get stiff, add the 1/4 cup of confectioners’ sugar and continue whipping until the cream hold medium stiff peaks.

Transfer the whipped cream to another bowl and refrigerate. Use a spatula to scrape out most of the whipped cream.

Put the cream cheese in the mixer bowl (no need to wash), and with the paddle attachment mix on medium until creamy. Add the 1 cup of confectioners’ sugar and beat until quite creamy and smooth. This will take about 4-5 minutes on medium speed.

Once mixed, it will be super creamy. So creamy that you’ll want to taste it. But be patient, we’ll let you know when to take a taste, and it’s not yet.

Add the peanut butter and milk. Peanut butter is a pain to measure, just do the best you can. It’ll be good.

Turn the mixer back to medium and work that peanut butter into the cream cheese. You might want to scrape down the sides of the bowl to get it all mixed in. Note that the mixture is starting to take on a mousse-like texture, which is exactly what you want.

Mix in 1/4 of the whipped cream. Use a rubber spatula to fold about 1/4 of the whipped cream into the peanut butter mousse; the exact amount isn’t critical. This will help lighten the batter and is the secret to folding airy batters into heavier batters. We’re sure they teach this at Le Cordon Bleu.

Now fold in the remaining whipped cream, trying to keep the batter as light as possible. Folding is tricky; we try to use the spatula to push in the cream and pull up the heavier batter from the bottom to cover more of the cream. Do the best you can, and you’ll get better and better. It’s okay if there are small streaks of whipped cream not incorporated. This cheesecake will be amazing, regardless.

Scoop the batter into the crust, smooth the top as best you can and refrigerate for at least four hours. After an hour or so, cover with plastic wrap so the mousse doesn’t dry out.
Whew! We’re almost through. It seemed like a lot to do, but going step by step made it pretty easy.
Make the ganache (chocolate coating):
Do this after the cheesecake has chilled thoroughly.

Place the 4 ounces of chocolate in a heatproof bowl, and microwave at 50% power until it begins to melt. Many people recommend placing the bowl over a pan of boiling water, but the microwave is perfect for this job. Ours took a total of 2 1/2 minutes (watching carefully).

Meanwhile, bring the 1/2 cup of cream to a boil in a saucepan.

Pour the boiling cream into the bowl of chocolate, and stir with a rubber spatula until well mixed and shiny. As you mix, it’ll look more and more like shiny chocolate and not milk chocolate.

Spread the ganache on the cheesecake as smoothly as you can, and put it back in the fridge to harden. Again, unless you’ve done this a million times, it won’t be perfect. Who cares? It’ll taste wonderful.
Unmold the cake.
For a springform pan, run a towel under hot water, wring it out, and wrap around the edges of the pan for a minute. Run the towel under hot water again, wring it out, and set the springform pan on of the towel top for a minute. Now carefully undo the springform pan. It should come away from the edges. Then take a wide spatula and lift the cake off the bottom. Or alternatively, just serve the torte from the bottom of the springform pan.

For the parchment-lined cake pan, carefully lift the cake out and place on a plate. Slide the parchment from underneath. Or trim off the edges of the parchment paper and let it go at that. It would have looked a bit nicer with crust that went all the way up the sides, but that’s how it goes.
I’ll have to give this cake four stars for “is it worth it?” and that’s just because it makes sooo much for just the two of us. But perfect for a potluck … or if we cut the recipe in half.

