
We know that we just had several days of dessert posts earlier in the week, but you can blame it on Eat an Extra Dessert Day (September 4; look it up). While it doesn’t help this year, keep this tart in mind for next year’s EaEDD.
Actually, we made this tart to bring to an afternoon Labor Day party. Since the party started in the afternoon, and we’re so big on the freshness of our foods, we choose a dessert that we could easily make in the morning and have ready by noon. (Well, it still needs just a touch of work in advance, but it’s easy). You’ll see.
This is another recipe by Gesine Bullock-Prado, the undisputed master of great-looking and challenging cakes — you can see some of her masterpieces at gbakes.com — but, this is a straightforward tart, one we modified just a bit. We’ll mark the modification as an optional step so you can choose to make the original, or the Scratchin’ It special, or even both.

Chocolate Caramel Tart
Ingredients
For the crust
- 1/2 cup unsalted butter, room temperature, plus more for greasing (1 stick)
- 1/2 cup granulated sugar (100 g)
- 1 cup all-purpose flour (140 g)
- 6 Tbs Dutch-processed cocoa (31 g)
- 1 tsp instant espresso powder
- 1/2 tsp kosher salt
For the caramel
- 2 cup sugar (400 g)
- 1/3 cup corn syrup (110 g)
- 1/2 cup water (120 g)
- 1 tsp kosher salt
- 1/4 tsp lemon juice
- 1/2 cup heavy cream (120 g)
- 1/2 cup unsalted butter, cut into 8 pieces (1 stick)
- 1 tsp vanilla bean paste or extract
For the ganache
- 115 g bittersweet chocolate, finely chopped (4 ounces)
- 1/3 cup heavy cream (80 g)
- 2 Tbs unsalted butter (30 g)
- 1/2 tsp vanilla bean paste or extract
- Pinch of salt
For accent (optional)
- 3 Tbs cocoa nibs
Instructions
For the crust
- In the bowl of a stand mixer fitted with the paddle attachment, cream together butter and sugar on medium speed until light and fluffy, 3 to 5 minutes.
- Meanwhile, in a small bowl, whisk together remaining crust ingredients. Reduce mixer speed to low and add flour mixture, mixing until just combined.
- Turn out dough onto a clean work surface, and, using the heel of your hand, smear the dough lightly and rapidly, folding the dough back on itself as needed, until smooth, about 1 minute.
- Shape into a rectangle, wrap in plastic, and refrigerate overnight.
- Preheat oven to 350°F. Butter a 4x13-inch tart pan.
- Use your fingers to press the dough into the tart pan in a even layer. Cover with baking parchment and pie weights.
- Place on a baking sheet and bake 15 to 20 minutes. Remove weights and parchment and continue to bake until crust looks dry and feel slightly firm, another 15 to 20 minutes.
- Cool completely.
For the caramel
- Place the sugar, corn syrup, water, salt, and lemon juice in a heavy-bottomed saucepan over medium-high heat. Stir until sugar is completely dissolved, then discontinue stirring and let cook until it's medium amber in color.
- Remove from heat, and add cream and butter, stirring until completely incorporated. Return to heat and insert a candy thermometer. Cook, stirring occasionally, until caramel reaches 244°F.
- Remove from heat, stir in vanilla, and let stand 30 minutes to cool.
- Carefully release the sides of the tart pan from the crust and use the bottom of the pan to transfer it to a serving dish. Fill tart crust with caramel sauce, and place in the refrigerator to chill for 30 minutes.
For the ganache
- Place the chocolate in a heatproof bowl.
- Combine the heavy cream, butter, vanilla, and salt in a small saucepan over medium heat. Bring to a simmer, making sure the butter is completely melted.
- Pour the hot cream mixture over the chocolate and let stand for 3 minutes. Whisk until smooth and glossy.
- Pour the ganache over the caramel and either tilt the tart to spread or use a spatula to cover the caramel completely.
- Sprinkle the edges of the tart with cocoa nibs (optional).
Ingredient discussion:
Dutch-processed cocoa is treated with an alkali, resulting in a darker, almost black, and less bitter cocoa. Our choice is Valrhona cocoa, but you might have others. With chocolate and chocolate products, as with nearly everything, you get what you pay for; we suggest that you use the best you can. Oh, we didn’t have espresso powder, so we omitted it. In retrospect, we might have added a bit of Kahlua, or a tiny pinch of cinnamon, as coffee flavors and cinnamon helps to bring out the flavor of chocolate. For corn syrup, we go with Karo brand corn syrup because it’s widely available and doesn’t have added high-fructose corn syrup. So what’s up with the lemon juice? It add a bit of acid, which will break down some of the sucrose into glucose and fructose — too much chemistry — breaks some sugars into a mix of sugars, and a mix of sugars is less likely to crystallize. Finally, cocoa nibs are bits of the cacao beans left after fermenting, roasting, and hulling. Bare-bones chocolate. We use Valrhona brand cocoa nibs.
Procedure in detail:
You may note that we have fewer than the usual number of photos. We were also making and Alsace Onion Tart for the party, and, as the morning progressed, we started forgetting to stop for a photo op.
For the crust:
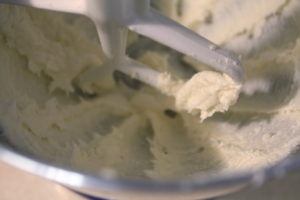
Cream butter and sugar. Place the butter in the bowl of a stand mixer fitted with the paddle attachment and beat on medium until smooth and shiny, about 30 to 60 seconds. If it’s taking longer, let your butter warm more. Once smooth, slowly add the sugar to the butter. We add it at the rate at which the butter will incorporate the sugar. Once added, continue to beat on medium-high until light and fluffy, about 3 to 5 minutes.
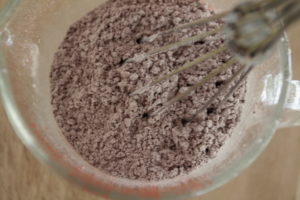
Whisk dry ingredients. While the mixer is running, use the time to measure out the flour, cocoa, espresso powder, and salt into a small bowl. Whisk together until uniform in color.
Mix in dry ingredients. Turn the mixer speed to low, and pour in the dry ingredients. Continue to mix on low until just combined, then stop.
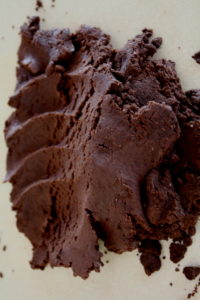
Lightly knead (fraiser). Turn the dough onto a clean work surface and lightly knead it smooth by smearing the heal of your hand across the dough. Once smeared out, use a bench knife to fold the dough back on itself and smear it again. Do this for about a minute, or until the dough is smooth. This style of kneading is known in French as fraiser, and should be used when you don’t want to work the dough so much that the gluten starts to develop, resulting in a tough crust.
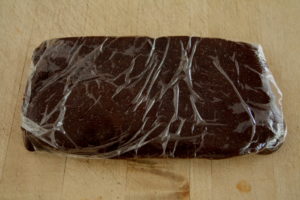
Chill. Wrap in plastic and chill at least 30 minutes, but preferably overnight.
Preheat oven to 350°F. Butter a 4×13-inch tart pan with removable bottom.
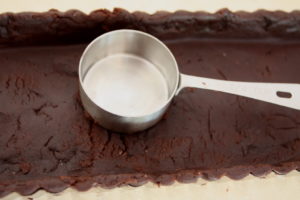
Press. This dough does not roll out. Don’t even try it. It won’t work. So, break off pieces of the chilled dough and press it into the pan, making sure the edges are about 1/4 inch thick. You can use a small measuring cup with a flat bottom to press the crust smooth.
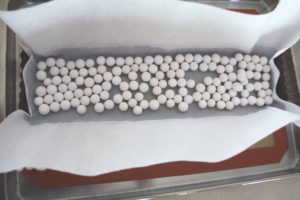
Blind bake. Place the tart crust on a baking sheet to catch any butter that bakes out. Line the tart crust with a piece of baking parchment (or aluminum foil) and cover with pie weights. Remember that dried beans or dried rice make great pie weights. Bake the crust for about 15 to 20 minutes, then remove the weights and parchment and bake until the crust looks dry and is slightly firm — it will still give when pressed lightly — about another 15 to 20 minutes.
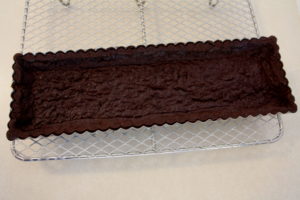
Cool. Let the crust cool completely in the pan. This is a fragile crust; if you remove it too early, you might end up with chocolate cookie crumbs.
For the caramel:
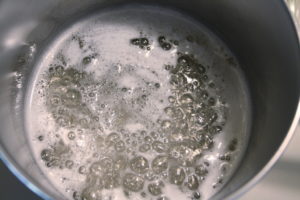
Cook sugars. Place the sugar, corn syrup, water, salt, and lemon juice into a heavy-bottomed saucepan over medium-high heat. Stir continuously (use a wooden spoon so the handle doesn’t get hot) until all the sugar is dissolved. Stop stirring and continue cooking until the sugars are a medium-amber color. The original instructions said it should be slightly lighter than the color of a copper cent.
Add cream and butter. While the caramel is off the heat, add the cream and butter and stir until completely mixed. It should really look like a light caramel sauce now, one that would be perfect for pouring over a frozen dessert.
Cook to 244°F. Return to the heat, insert a candy thermometer, and continue cooking, stirring occasionally, until the caramel reaches 244°F, then immediately remove from the heat. This temperature — the soft ball stage — ensures that the caramel is still soft, but slightly oozy when the tart is cut. And who doesn’t want oozy caramel?
Add vanilla. We like to add the vanilla after the caramel has finished cooking, so stir in the vanilla, taking care not to get spattered as it boils. (We think that adding the vanilla earlier will result in more of the vanilla flavors being boiled off during cooking).
Cool and fill crust. Let the caramel cool and thicken for about 30 minutes. While it’s cooling, carefully release the sides of the tart pan and remove the crust from the mold. Leave it on the bottom of the tart pan as you transfer it to a serving plate, then carefully slide the crust off the bottom of the pan. Pour the slightly cooled caramel into the tart shell, moving from side to side to fill it completely. The caramel will shrink just a bit as it cools, so it’s okay to get very close to the top. You’ll have some caramel left over; use it on ice cream.
Chill. Place the tart in the refrigerator and chill for 30 minutes. This will help keep the caramel and chocolate layers separate. If the caramel is too warm, the chocolate ganache will melt into the caramel. If that happens, just tell people that was the plan all along.
For the ganache:
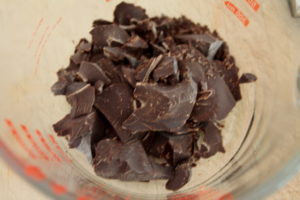
Chop chocolate. If you haven’t already, chop the chocolate finely. We made sure that most pieces were less than about 1/2 to 3/4 of an inch across, which seemed to work. Even finer would be better; much larger, and you’ll risk not having it all melt. Place the chocolate in a heatproof bowl.
Simmer cream and butter. Place cream, butter, vanilla, and salt in a small saucepan and heat over medium, stirring often, until the butter is completely melted and the cream has just begun to simmer.
Stand. Pour the hot cream mixture over the chocolate and let stand for 3 minutes so it can work its magic by melting the chocolate. We know it’s tempting to start whisking early, but you won’t gain anything, and you might end up with lumps of chocolate left in the ganache.
Whisk. Use a small whisk to beat the chocolate into the hot cream. Continue whisking until the chocolate is completely melted and the ganache has taken on a nice shiny look. The shine means that the chocolate is emulsified into the cream, which should result in a ganache that sets like chocolate.
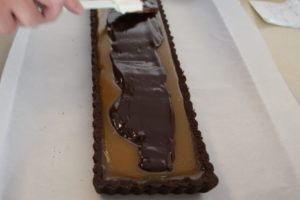
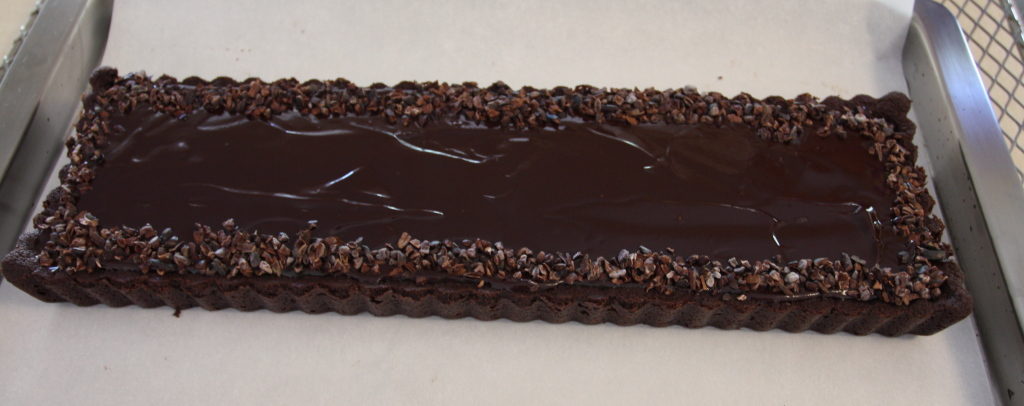
Coat. Pour the ganache over the caramel, and either tilt the tart from side to side or use a spatula to spread the ganache all the way to the edges. Try to seal the caramel under a layer of chocolate so that the people enjoying the tart won’t realize that there’s caramel inside until they cut into it. Everyone likes surprises, especially sweet surprises.
Finish:
Sprinkle cocoa nibs. This is the part we added to the recipe, and we think it’s a good addition. Sprinkle an edging of cocoa nibs on the tart. Aim for a half-inch wide band up along the crust. The nibs add a bit of bitterness, but, more importantly, add more crunch to the tart, making eating the tart more interesting.
Chill. This wasn’t in the instructions, but we liked this tart even better when it had chilled overnight. Caramel, being essentially sugars, can be sweet, but chilling takes away some of the sweet taste, making for, we thought, a better balance between the sweetness of the caramel and the bitterness of the dark chocolate.
This is a great tart. It might seem involved, but, really, the only slightly difficult part is making the caramel. And that’s really no more than boiling a liquid to a desired temperature. If you feel like cheating and using some store-bought caramel, we really suggest that you don’t. Home-scratched caramel is light years away from the weird-tasting stuff available in stores, and it isn’t that difficult to make. The ganache simply involves simmering some cream and whisking it into chocolate, and the crust is easy to make, too. But, put it all together and it looks like a tart that could be in the window of a patisserie! And, it tastes like it, too! Five stars!
