
This is what we were planning to make with the Bouchon’s Chocolate Mousse that posted the other day. Basically, a simple chocolate-hazelnut tart. And, it is pretty simple. A simple crust that you bake and fill with chocolate mousse. Nothing more. But, don’t let simple fool you into thinking that it won’t stand out. Sometimes the simplest desserts can be the best.
As you probably guessed this recipe comes from Bouchon, by Thomas Keller. We already have the chocolate mousse made and siting in the refrigerator, so, all we need to do is make the crust. Now, we made our crust and mousse on the same day, but we’re going to recommend to all our fellow scratchers that you make the tart dough a day in advance and refrigerate it overnight. Our dough was still very soft after just an hour in the fridge, making it a bit difficult to handle.

Torte au Chocolat (Chocolate Mousse Tart with a Hazelnut Crust)
Ingredients
For the crust
- 45 g toasted and skinned hazelnuts (1/3 cup)
- 40 g sugar (3 Tbs)
- 1 tsp kosher salt
- 140 g unsalted butter, cold and cut into small cubes (10 Tbs) plus more for the pan
- 210 g all-purpose flour (1 1/2 cups) plus more for the pan
- 30 g ice water (2 Tbs)
For finishing
- Bouchon's Chocolate Mousse (1 batch) see note
- Cocoa powder for dusting
- 30 g toasted, skinned, and chopped hazelnuts (1/4 cup)
Instructions
For the crust
- Finely grind hazelnuts in the bowl of a food processor. Add sugar and grind again.
- Transfer to the bowl of a stand mixer fitted with the paddle attachment. Add salt and butter cubes and cream until smooth, about 3 minutes.
- Gradually add flour and mix until combined, adding ice water to help the dough come together.
- Form dough into a disk, wrap in plastic, and refrigerate at least 1 hour, preferably overnight.
- Butter and flour a fluted 10- to 11-inch tart pan with removable bottom. Set aside.
- Lightly flour a work surface and roll dough into a about a 14-inch circle, 1/4 inch thick. Transfer to tart pan and press into place. Trim away excess dough.
- Prick the bottom of the tart crust with a fork, and refrigerate for 15 minutes.
- Preheat oven to 375°F.
- Line the tart with parchment paper and cover with pie weights.
- Bake until edges of the crust are light golden brown and the bottom of the crust looks dry, about 20 minutes.
- Remove pie weight and parchment and continue baking until the crust is golden brown, about another 15 to 20 minutes.
- Let crust cool completely.
For finishing
- Spoon the mousse into the tart crust and smooth with a small offset spatula.
- Refrigerate for 8 hours before removing from the tart pan.
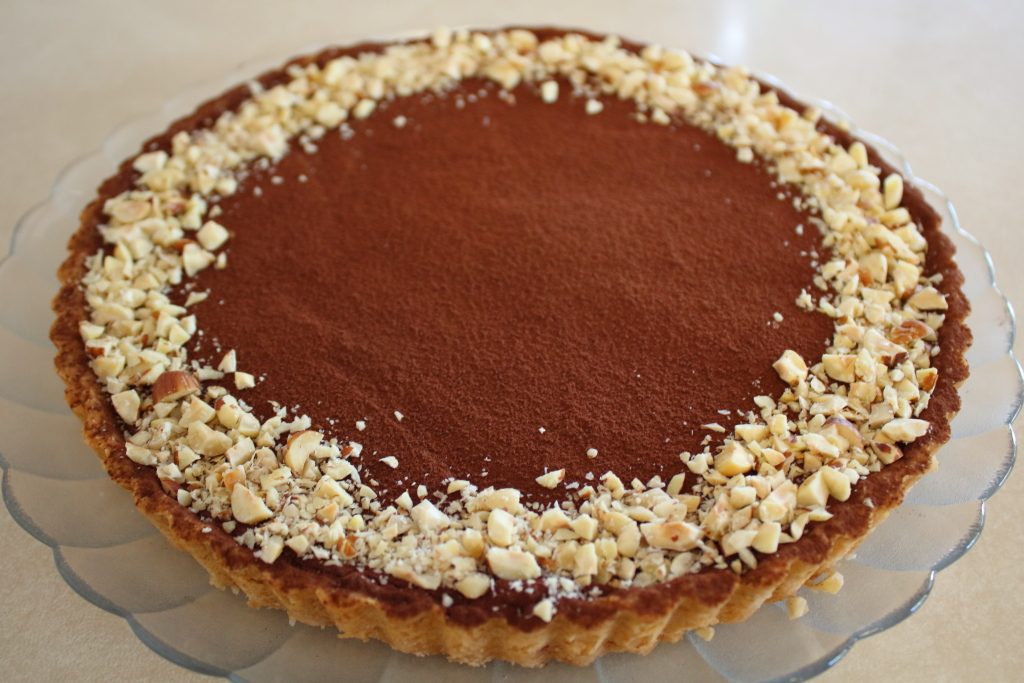
- Dust the surface with cocoa powder and place chopped hazelnuts around the edge.
Notes
Ingredient discussion:

The original recipe listed the ingredients by volume, but, since we’ve been measuring more and more by weight, we converted them to grams for our future reference. Oh, how we do wish we could find already-skinned hazelnuts, as it’s hard to remove all the skins. We just do the best we can. If you’re in the same situation, toast the hazelnuts, and, when the skins start to crack and peel off, let the nuts cool and rub off as much of the skin as you can. You can toast the nuts by placing them in a skillet over medium heat for about 15-20 minutes, or, in a 350°F oven for the same length of time. Either way, make sure to stir the nuts around often. The other thing we’ll say is to stick with unsalted butter. You’re adding salt to the crust, so you don’t need the butter to add even more.
Procedure in detail:

Grind hazelnuts. The original recipe suggested using a spice grinder, but we went with a trusty food processor. You do need to watch what you’re doing, as you could turn the hazelnuts into hazelnut butter — tasty, but not appropriate for tart crust. Place the hazelnuts in the bowl of a food processor and pulse it a few times to get the nuts broken up. Then, let the food processor run until the nuts are finely ground. Add the sugar and grind again. The sugar will help prevent turning the nuts into nut butter. Also, another tip: if your food processor has a tendency to spew out a bit of whatever you’re processing, set the whole thing down in a dry kitchen sink. That way you can simply wipe off whatever spews out.

Cream with butter. Transfer the nuts and sugar to the bowl of a stand mixer fitted with the paddle attachment. Add the butter and start the mixer on slow. As the butter starts to get incorporated, increase the speed of the mixer to medium, and cream everything together until smooth and no pockets of butter remain, about 2-3 minutes. Ideally, the bowl should still be cool to the touch from the cold butter.

Make dough. With the mixer on the lowest setting, slowly add the flour and mix until incorporated. Add the ice water, a tablespoon at a time, and stop the mixer when a dough forms and clumps onto the paddle. Turn the dough out onto a work surface and gently smear the dough a few times with the heel of your hand, folding the dough as you work.

Refrigerate. Shape the dough into a disk, wrap in plastic, and refrigerate for at least an hour, preferably overnight. If you have to roll out the dough in the next hour or so, make a thinner disk to help it chill faster.
Prepare pan. While the dough is chilling, butter and flour a tart pan with a removable bottom. If the pan is fluted, make sure to get butter into all the flutes; you’d hate for the tart to break as you remove it from the pan later.

Roll dough. Once the dough is chilled, lightly flour a work surface and roll the dough into a circle about 14 inches in diameter and 1/4 inch thick. As you roll, dust the surface of the crust with flour, and occasionally dust underneath the crust to keep it from sticking. Now for the hard part: somehow transfer the dough and place it over the prepared tart pan. You can do this by gently rolling the dough around your rolling pin and unrolling it over the tart pan, or by using a large bench scraper or spatula to help lift it. Don’t fret if it breaks here and there as you’re moving it. Lift the edges of the crust to allow it to settle into the tart pan and gently press it into the sides and corners of the pan. Patch any cracks or tears with the excess dough. Finally, trim all the excess dough away from the pan.

Refrigerate. Prick the bottom of the tart crust with a fork — this is known as docking; it will help to keep the tart crust from puffing up while it bakes. Place the crust in the refrigerator for 15 minutes.
Preheat oven to 375°F. While the crust is chilling, preheat the oven and get out a rimmed baking pan large enough to hold the tart pan and any butter that seeps out as it bakes. Otherwise, the tart crust may release butter, which will seep out of the bottom of the pan, potentially setting off the smoke alarm as the butter burns on the floor of the oven.

Blind bake. Cover the crust with parchment or aluminum foil and fill with pie weights. Be gentle when placing the pie weights, as you don’t want to damage the crust. If you don’t have pie weights, dried beans or rice will work, too. With the weights and parchment in place, bake the crust for about 20 minutes. The edges of the crust should be browning and the parchment should not be sticking to the crust. Remove the weights and the parchment and bake another 15-20 minutes, or until the crust is a rich golden brown.

Cool. Let the crust cool completely, as you don’t want the mousse to melt as you fill it.

Fill. Spoon the mousse into the crust, spreading it around with a spatula. Once filled, smooth off the top as best you can with a small offset spatula. It doesn’t have to be perfectly smooth, but take your time and make it very smooth. You’ll be rewarded with a better-looking tart at the end.
Refrigerate. Refrigerate the tart for at least 8 hours so the mousse can set completely. We placed ours in the fridge for about an hour to set up just a bit before wrapping with plastic. and letting it refrigerate overnight.

Finish. Unwrap the tart and place it on several pieces of newspaper to catch any excess cocoa. Place about a teaspoon of cocoa in a small fine-mesh strainer and use a spoon to tap and stir the cocoa through to cover the tart evenly. If you had a smooth surface to begin with, the tart should look velvety. Take the chopped hazelnuts and carefully spread them around the edges of the tart. This helps to cover up any places where the mousse pulled away from the crust. Finally, carefully remove the tart and place on a clean plate for everyone to admire before slicing and serving.
A nice, smooth, light desert. It’s not really sweet; after all, the mousse only has a bit of sugar, and it’s super light and tasty. It looks really nice — oh, the wonders of how cocoa will cover imperfections — making it look like a professionally-made dessert. And, while it seems as if there are lots of steps, most of them are easy and straightforward, achievable by pretty much anyone. (And, if you have a failure, it tastes the same). Five stars.
