

Okay, right off the bat, we’ll let you in on a secret. We didn’t use mascarpone cheese for the ravioli you’ll see in these photos. We really used a fresh goat cheese, which turned out really well. It’s just that we think this would be even better with mascarpone cheese, and we plan to use that next time, so we’re going to tell you how to make it using mascarpone.
This recipe has been bouncing around in the brain of one of the staff members here at Scratchin’ It Central for several years. Over the years, it’s percolated away, mainly just the image of ravioli made from chocolate, filled with something sweet, and served with a red sauce, all as a dessert. Then one day, we instructed the entire crack staff to “Drop everything! Make dessert ravioli! Now!”
And, a short time later — done.

Chocolate Ravioli with Mascarpone Filling
Ingredients
For the chocolate pasta
- 75 g all-purpose flour, plus more for kneading (1/2 cup)
- 15 g Dutch-processed cocoa (3 Tbs)
- 25 g confectioners' sugar (3 1/2 Tbs)
- Pinch salt
- 1 large egg
For the filling
- 85 g mascarpone cheese (or fresh goat cheese) (3 ounces)
- 20-40 g honey (1-2 Tbs)
- Pinch salt
For serving
- Cherry or raspberry jam warmed
- White chocolate for garnish
Instructions
For the chocolate pasta
- In a medium bowl, whisk together flour, cocoa, sugar, and salt. Add egg. Using a fork, beat egg and slowly incorporate flour mixture until it forms a dough. Turn out dough onto a clean work surface and knead for about 5 minutes, or until smooth and uniform. If needed, dust work surface with flour to prevent sticking. When done, the dough should not be sticky.
- Wrap in plastic and let rest 30 minutes.
For the filling.
- In a small bowl, stir together cheese, 1 tablespoon honey, and salt. Add additional honey as needed to make a smooth and sweet, but stiff, filling.
For assembly.
- Divide dough into two pieces, and, working with each piece at a time, roll dough into sheets about 1/16th inch thick.
- Place about a teaspoon of filling in mounds about 1 inch apart. Place another sheet of dough on top and press out excess air. Cut out ravioli with a cutter or fluted pastry wheel.
- Transfer ravioli to a baking sheet lined with parchment or silicone baking mats.
- Leftover dough may be re-rolled. Continue making ravioli until filling is used.
- Freeze raviolis on the baking sheet, then transfer to a freezer bag for longer storage.
To serve
- Bring a saucepan of water to a simmer. Place frozen ravioli in water and simmer until tender, 2-4 minutes.
- Place ravioli in bowls, and top with a tablespoon of jam. Use a vegetable peeler to shave white chocolate on top.
Ingredient discussion:
So, what is Dutch-processed cocoa and why did we select it for this recipe? It’s cocoa that’s been treated with an alkali, rendering a darker, less bitter cocoa. We figured that we can’t add too much sugar to pasta trying to mask the bitterness, so we’d rather start with something less bitter to begin with. Our egg came from the ranch where we know the hens are well cared for, and are allowed to peck in the grass. We think they taste better, buying them supports local people, and it lets hens be hens. We suggest that you find someone local raising hens and buy your eggs from them. You win, they win, and the hens win. What could be better? We mentioned above that we used fresh goat cheese (from Black Mesa Ranch), but we think this would be a better dessert with mascarpone, which you can make yourself. Instructions can be found by following the link.
Procedure in detail:
For the pasta:
Whisk dry ingredients. This really isn’t made any differently than any other egg-based pasta, so, if you already know how to make pasta, you’re set. Simply put the flour, cocoa, powdered sugar, and salt in a medium bowl and whisk to combine and break up the lumps of cocoa. We might have even considered sifting the cocoa, but we knew that we’d be kneading the dough for a few minutes, which should take care of any lumps.
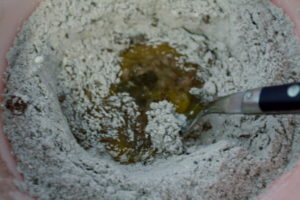
Add egg. Make a well in the center of the flour mixture and add the egg. Use a fork to break it up and start working in the flour. Continue until most or all the flour mixture is incorporated and you have a dough.
Knead. Turn the dough onto a clean work surface and knead for about 5 minutes. If the dough is sticky, dust the work surface with flour to work a bit more flour into the dough. You should end up with a soft, but not sticky, dough.
Rest. Shape into a ball, wrap in plastic, and let rest for about 30 minutes to relax the gluten. If you wish, you can refrigerate the dough for as long as a day; just bring it out of the refrigerator to warm about 30 minutes before you begin rolling.
For the filling:
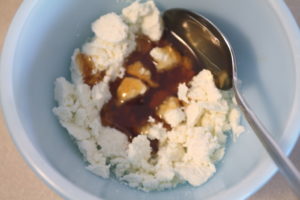
Mix. Simple, simple. Place the cheese, a tablespoon of honey, and salt in a small bowl and mix to combine. Taste the mixture and see if it’s sweet enough for you. If not, you can add more honey, but make sure that the resulting mixture is still stiff and spoonable. Once mixed, set aside.
For assembly:
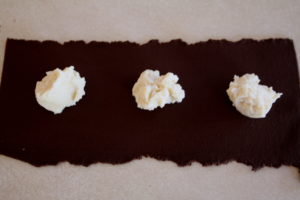
Roll pasta. Easiest with a pasta machine, but possible with a rolling pin. Divide the dough into two equal portions, and, working with one at a time, roll the dough into a sheet about 1/16th of an inch thick. Use a teaspoon to place filling mounds on the dough about an inch apart.
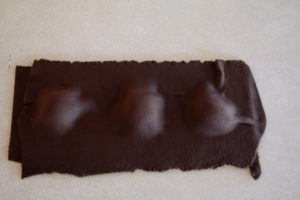
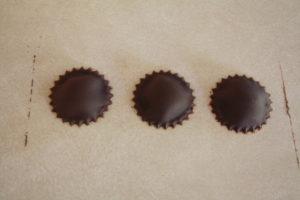
Cover, seal, cut. You can either roll out another piece of dough for a cover, or, you can fold the dough in half, covering the filling. Once covered, press out the air from near the filling and press down to seal. Finally, cut out ravioli using a ravioli cutter, a fluted pastry wheel, or even a knife.
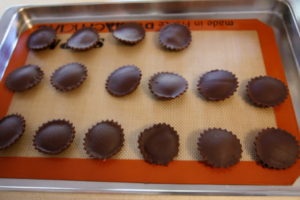
Freeze. Place the ravioli on a baking sheet lined with parchment or a silicone mat or something no stick. Once the baking sheet is full, place in the freezer for at least 30 minutes. Transfer the ravioli to an airtight freezer bag for longer storage in the freezer.
For serving:
Cook pasta. Bring a saucepan of water to a simmer. The size and amount of water depends on how many ravioli you’ll be cooking. We did three each, plus a few extra pieces of chocolate pasta, so we used a small saucepan. Once simmering, swirl the water and drop in the ravioli, no need to thaw. The swirling should keep the pasta moving so that it doesn’t stick to the bottom of the pan. After 2 to 4 minutes, check the pasta for doneness (for us, having the small pieces of extra pasta was perfect for testing; we could scoop one out and taste it).
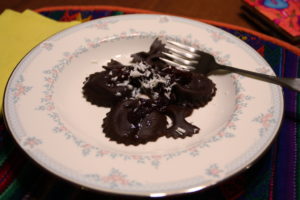
Plate. Once done, lift the ravioli out of the water with a slotted spoon and shake off excess water. Place in a shallow bowl, top with some warm jam (to look like ravioli sauce), and, using a vegetable peeler, shave white chocolate on top to look like grated Parmesan cheese.
Happy. We didn’t know how these would turn out. Would the sugar in the pasta cause it to dissolve and leak filling? Or would it just leach out, leaving a bitter pasta? We simply had no idea. It turns out that neither happened. The ravioli stayed together, and remained slightly sweet. The sauce, although it’s hard to see on the chocolate ravioli, was simply Cherry Lambic Jam that we made ourselves. It had a perfect texture to mimic tomato sauce. We did have problems making nice curls of white chocolate; it was brittle and broke into small pieces, even though we warmed it in the microwave (next time we’ll warm it more), but the dish looked great. And, it tasted great, especially the creamy filling, which oozed out of the ravioli. Even though this is more involved than some desserts, it’s easier than most; plus, we think it has more eye-appeal. Five stars.
