
Occasionally we need to make up a little something for a dinner meeting that takes place once a month. It’s never any trouble; in fact, often, the hardest part is deciding what to make. This month, we discussed various options for a vegetable side dish, but none was “vegefied enough.” They all relied on some sort of starch to bulk them up: you know, pasta- or rice- based casseroles, that sort of thing. So, we went back to the stacks in The Scratchin’ It Central Library, and came up with this recipe.
It comes from Ad Hoc at Home, by Thomas Keller, and those who’ve read our other posts know that we really like Chef Keller’s recipes. They’re well-written and tested, so they just work. On top of that, they often result in some of the best-tasting dishes we’ve had. So, we figured that we’d try this one.
Now, interestingly enough, this is one of the few recipes from Thomas Keller that we’ve found needed some minor editing. It’s not as if you couldn’t figure out what to do — his recipes have exacting instructions — but, there was the inclusion of pepper in the ingredients list, but no mention of it in the instructions. More curiously was the instruction to place a cooling rack on a baking sheet; it was never mentioned again. Since we’ve written up a few recipes ourselves, we fully understand how this can happen — we’re sure our recipes are packed with far more egregious mistakes — and, with any other cookbook, we’d just say that’s how it goes, but we’re used to near perfection from Chef Keller’s recipes.

Summer Vegetable Gratin
Ingredients
- Canola oil
- 2 1/2 cups chopped onions
- 2 cloves garlic finely minced, or grated on a microplane
- Kosher salt
- 2 tsp dried thyme, divided or 4 teaspoons fresh
- 1 medium yellow squash
- 1 medium zucchini
- 1 Japanese eggplant (or other small narrow eggplant)
- 1/4 cup extra-virgin olive oil plus more for drizzling
- Freshly ground black pepper
- 2 to 3 Roma tomatoes
- 1/2 cup grated Parmigiano-Reggiano (2 ounces)
- 1/2 cup dried bread crumbs
Instructions
- Preheat oven to 350°F.
- Heat about 2 tablespoons of canola oil in a large skillet over medium heat. When hot, reduce heat to medium-low, add onions and garlic, sprinkle with salt and add 1 1/2 teaspoons of thyme. Stirring occasionally, cook until tender, about 20 minutes.
- Slice squash, zucchini, and eggplant into 1/4 inch thick rounds and place in a large bowl. Add 1/4 cup olive oil and toss to coat. Sprinkle with salt and pepper and toss again.
- Slice Roma tomatoes 1/4 inch thick and place rounds overlapping on a plate. Drizzle with olive oil and sprinkle with salt and pepper.
- In a small bowl, mix together grated cheese, bread crumbs, and 1/2 teaspoon dried thyme.
- Spread onion mixture on the bottom of a 9×13 inch (oval) gratin pan or an 8×8 inch baking pan.
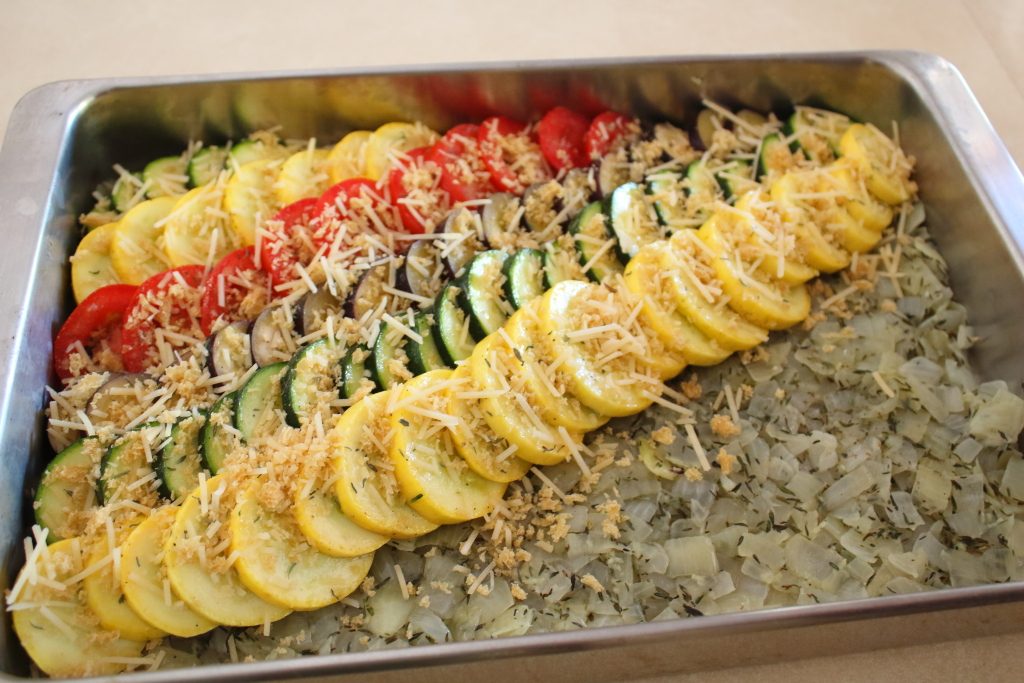
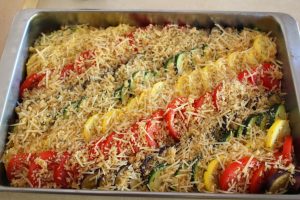
- Working on the diagonal, place a row of overlapping zucchini in the corner of the pan. Sprinkle with cheese mixture, followed by a rows of yellow squash, tomatoes, and eggplant, each overlapping the previous row, and sprinkle with cheese after finishing each row (see picture below).
- Continue placing rows of vegetables in the pan until the onions are completely covered. Sprinkle with salt and pepper, followed by the remaining cheese mixture.
- Bake for 1 to 1 1/2 hours or until the vegetables are very soft and easily pierced with a sharp knife. Let stand for 10 minutes.
- If desired, place gratin under broiler to brown.
Ingredient discussion:

Please note that in our photos we’re making a double size batch of Summer Vegetable Gratin, so you’ll see a lot more vegetables in our photos than what you’ll have. We would have loved to use fresh thyme, as originally called for, but we didn’t have any, so our version uses dried. This is probably one of the few places that we’ve ever used fresh tomatoes from the store. They were bland and we would have preferred fresh tomatoes picked when ripe, but, well, you can only do so much. Using Roma tomatoes is important because they’re more meaty and have less liquid than other tomatoes, which means they stand up to the extended baking time.
Oh, if you need bread crumbs, simply tear bread into pieces, pulse the pieces in a food processor, spread on a baking sheet, and bake at 250°F for an hour, stirring at the halfway mark. You’ll have bread crumbs as tasty as the bread you use.
Procedure in detail:
Preheat oven to 350°F.
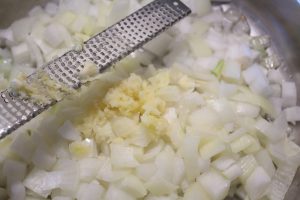
Cook onions. Heat about 2 Tablespoons of oil in a large skillet over medium heat. When hot, add onions and garlic, sprinkle with salt and 1 1 /2 teaspoons of thyme, and reduce heat to medium-low. Stirring occasionally, cook the onions until tender and translucent, about 20 minutes. We forgot to add the thyme right at the beginning, but it doesn’t matter a whole lot, as these onions will form the base of our gratin and will cook together with the thyme for a long while. We started cooking the onions first because we knew we could slice all the vegetables while the onions cooked, so let’s do that next.

Slice vegetables. Trim off the ends of the yellow squash, zucchini, and eggplant. Slice them into rounds about 1/4 inch thick. If possible, try to make the rounds similar in diameter by slicing some of the vegetables at an angle. This is really about the presentation; it’ll taste the same regardless, so just do what you can do. Once sliced, place them in a large bowl and toss with 1/4 cup of olive oil. Yes, it seems like a lot of olive oil, but it might seem like less if we call it 4 tablespoons. So toss away, then sprinkle generously with salt and some freshly ground black pepper and toss again.
Slice tomatoes. Trim off the ends of the Roma tomatoes and slice them 1/4 inch thick. Place the slices on a shallow dish or plate — we used a pie plate — and drizzle with olive oil. Sprinkle with salt and pepper, too, to help bring out flavor.
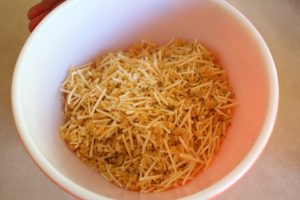
Make gratin topping. In a small bowl, mix together the bread crumbs, cheese, and remaining 1/2 teaspoon of dried thyme. It might seem to be a lot, but we’ll be adding some after layering each row of vegetables.
Spread onions. By now, your onions should be ready, so scrape them out into a baking pan and spread them into an even layer. Feel free to sprinkle with salt and pepper at this stage. It’ll be fine.
Layer vegetables. Here it’s easiest if you have a helper. From the bowl of sliced vegetables, pick out several zucchini rounds and make something like a row at an angle in the corner of the pan. This looks easier if you have an oval pan, but you can do it in a rectangular pan. Make sure the zucchini rounds overlap by about half, and do the best you can do. Once a row is completed, sprinkle with the cheese mixture. Next, select a bunch of yellow squash rounds and make a row of overlapping squash that overlaps the zucchini. This row should be a little bit easier. Once done, have your helper sprinkle that row with gratin topping. Continue by making rows of tomato rounds in the same way, followed by eggplant, always having your helper sprinkle topping. Continue making rows in the same order: zucchini, yellow squash, tomatoes, and eggplant, until all the onions are covered. Sprinkle with salt and pepper and the rest of the gratin topping evenly over the top.
Bake. Slide into the oven and bake for 60 to 90 minutes — yes, it seems like a long time, but it’s correct — rotating the gratin at 30 minute intervals, until the vegetables are very soft and easily pierced with a sharp knife. The grating topping will probably be browned by now, but, if not, we have a fix for that coming up. Let the gratin settle for about 10 minutes.
Broil. This step might not be necessary, but, if you wish, start up your broiler and place the gratin underneath it for a few minutes to brown. If your broiler is anything like ours, watch your gratin at all times, or you might have a new, less-than-tasty sensation known as burnt gratin.
It seemed like a lot of trouble to separate the vegetables after tossing them together, but they all look so different, that, in reality it wasn’t any trouble. We really loved this gratin, the top was crunchy, the vegetables soft and flavorful, and there was even a bit of flavorful juice on the bottom of the pan to soak up with bread. But, we still haven’t figured out the cooling rack on the baking sheet part. Five stars.
