A few weeks ago we were looking through Baking at République, by Margarita Manzke, and, as usual, we saw a number of recipes we wanted to try. We copied down a few to store in our vast archive here at Scratchin’ It Central, figuring we’d try at least a couple, including this one for biscotti. If you’re wondering how we can get recipes from so many different cookbooks, we have two words for you: Public Library.
We’ve made a number of biscotti in the past, including a nice Cocoa Nib Biscotti, but it never hurts to have a few extra horses in the stable. Or, in this case, a few extra biscotti recipes in the files. We like making biscotti because they’re pretty easy, and they keep really well, meaning you can make them several days in advance, clearing the tables for other more time-sensitive recipes. We’ll let you know up front that we followed the recipe, pretty much to the letter, but we highly recommend making two smaller diameter logs when you roll out the dough, which is reflected in our instructions, but not the photographs. If you don’t, you’ll have issues when you slice the biscotti. We’ll say more below.

Chocolate-Pistachio Biscotti
Ingredients
- 280 g all-purpose flour (2 cups)
- 25 g Dutch-processed cocoa powder (1/4 cup)
- 1 tsp baking powder (4 g)
- 1/4 tsp fine sea salt
- 150 g unsalted butter (10 1/2 Tbs) room temperature
- 175 g sugar (3/4 cup + 2 Tbs)
- 2 large eggs room temperature
- 140 g shelled pistachios (1 cup)
Instructions
- Preheat oven to 325°F. Line a baking sheet with a silicone baking mat or parchment.
- In a medium bowl, sift together flour, cocoa, baking powder and salt. Set aside.
- In the bowl of a stand mixer fitted with the paddle attachment, beat together butter and sugar on medium speed until light and fluffy, about 5 minutes.
- Add eggs, one at a time, beating on medium speed to incorporate thoroughly before adding the next.
- Add the flour mixture in two additions, mixing on low just long enough to incorporate between additions.
- Fold in pistachios.
- Cover and refrigerate dough for 15 minutes.
- Remove dough and roll into two logs about 12 inches long. Place on prepared baking sheet about 3 inches apart. Cover and freeze for 15 minutes.
- Bake for 40 minutes, rotating the baking sheet halfway through. Let cool.
- Slice the loaves at a 45 degree angle and return the biscotti to the prepared baking sheets.
- Bake for 45 minutes, flipping the biscotti halfway through baking so they dry completely.
Ingredient discussion:
We suggest using a cocoa with a lot of chocolate flavor: we like Valrhona dutch-processed cocoa, which we buy in bulk to make it cost effective. For eggs, use those that come from healthy, well-cared for hens. To us, that means from free-range hens that are really allowed to peck and scratch and eat bugs and grass. We think it’s just common sense that you’ll get better eggs. Oh, and we list the ingredients the way we measure them: by grams for larger amounts, by volume for smaller amounts, but we have both forms of measurement for most ingredients.
Procedure in detail:
Preheat oven to 325°F. Line a baking sheet with a silicone baking mat or baking parchment. Lining the pan is really to make for easy cleanup later, nothing more.
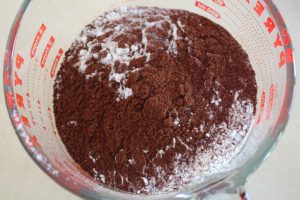
Sift dry ingredients. Cocoa is lumpy, so it’s always a wise move to sift it before use. And, since it’s lumpy, we measure it into the sifter first, followed by the remaining ingredients. That way, the cocoa sees the most sifting action, but, even then, there are a few lumps at the end that we have to break up with a spoon. Once the ingredients are sifted into a medium bowl, set aside.
Cream butter and sugar. This technique is used in all kinds of recipes: basically combine the butter and sugar in the bowl of a stand mixer fitted with the paddle attachment and start mixing. Increase the speed to medium and let the mixer do the work of creaming them together. After about 5 minutes, the mixture will be pale in color and light and fluffy, which is perfectly creamed. Creaming helps to ensure that air is trapped in the butter, which should make for a lighter end product.
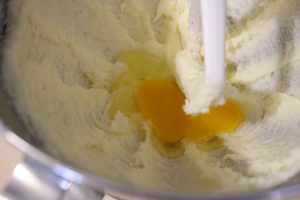
Add eggs. Turn off the mixer and add the eggs one at a time, beating each one in completely before adding the next. At this stage, you really can’t beat the mixture too much, so err on the side of beating longer.
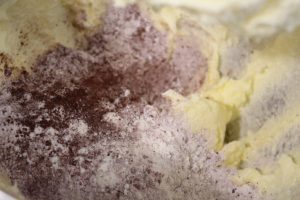
Add dry ingredients. Again, turn off the mixer and add the flour mixture in two additions. After each addition, pulse the mixer just a bit to start incorporating the flour without causing it to spew out. Once the danger of spewing is over, mix on low until just incorporated. Here, if you mix too long, you risk developing the gluten in the flour, yielding a tough biscotti.
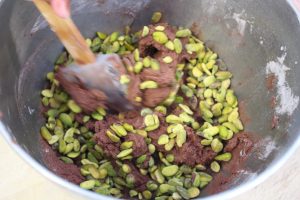
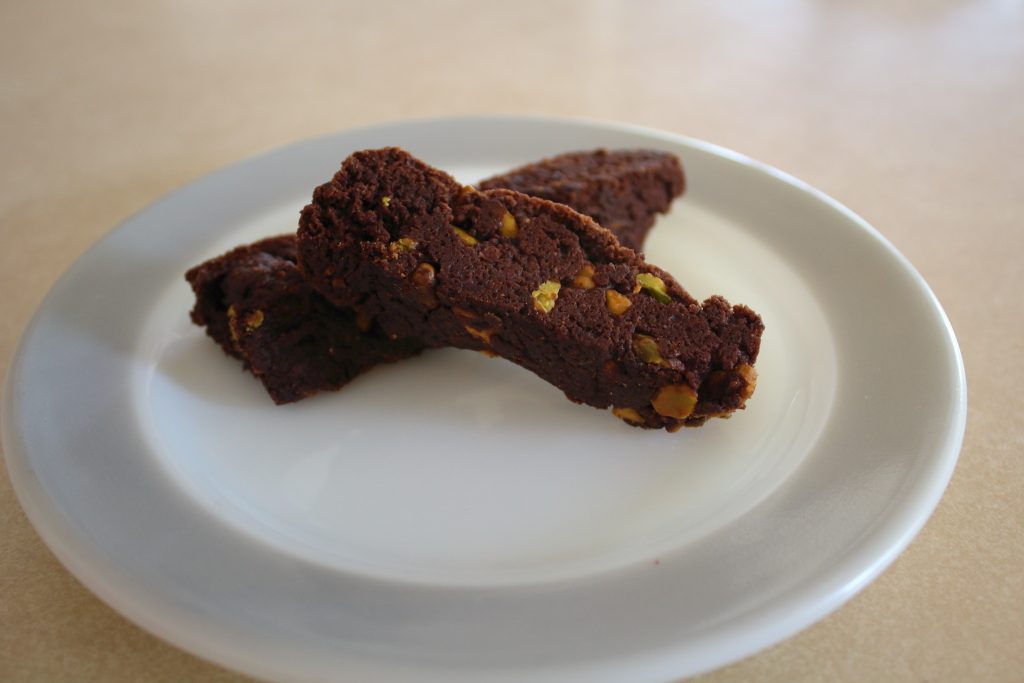
Fold in pistachios. Use a spatula or large spoon to fold in the pistachios. You could use the mixer to fold them in, but many of the nuts would get broken; one of the nice things about this biscotti is the contrast of the green pistachios with the dark chocolate surrounding them.
Refrigerate dough. For this step, the original instructions suggested shaping the dough into a disk, wrapping it in plastic, then refrigerating. We just shaped the dough somewhat in the bowl, and popped it into the fridge. It’s only going to be in there for 15 minutes, so we didn’t even bother covering it. It’s not as if it’ll dry out completely in 15 minutes. If you want, you can shape it into a disk, etc, but, whatever you do, chill the dough for 15 minutes.
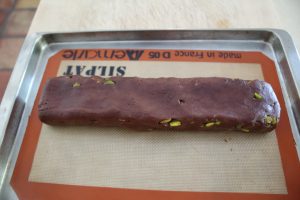
Shape dough. This is the one step that we really suggest you modify. Instead of making one 12-inch log of dough, we strongly suggest that you make two skinnier, but still 12-inch-long logs. With just one, the dough spread a lot, creating a loaf that’s too wide to slice easily without breaking, so go with two loaves. We shaped ours by rolling it directly on the prepared baking sheet.
Freeze. Once shaped, leave about 3 inches of space between the two logs and freeze them for 15 minutes. Again, since it’s such a short amount of time, we didn’t bother wrapping or covering the logs.
Bake. Slide into the oven and bake for 40 minutes, rotating the baking sheet halfway through. The dough will spread a lot, but that’s normal for biscotti dough. The spreading is what produces the characteristic flattened loaf shape.
Cool. Let the loaves cool. They can be slightly warm, but, really, let them cool most of the way. Again, this is so it’ll be easier to slice them without having them break into pieces as you work.
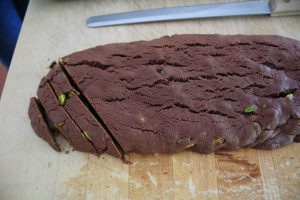
Slice. Use a long serrated knife to slice each loaf at a 45 degree angle, making slices about 1/2 inch thick. We couldn’t really get our slices 1/2 inch thick without everything breaking apart, so we ended up with slices closer to 3/4 of an inch thick. It’s all good. As you work, place the slices on the prepared pan (you might need a second pan to hold all the slices).

Re-bake. This is the biscotti part — biscotti means twice baked — slide the slices into the oven and bake until completely dry, about 45 minutes, flipping each slice over halfway through.
These biscotti are okay, but, in our opinion, not great. Following the original recipe resulted in very long biscotti that tended to break apart, which made them frustrating to bake. We think you should be having fun when baking, not fighting with what you’re creating. And, we really think these could have more chocolate flavor. Overall, we tend to think we’ll stick to other biscotti recipes. Three stars.

