
Does home-made pasta seem difficult? We thought so too, but once we tried it we found out that, not only is it really easy, but it makes your pasta-based dinners even better. Now we make fresh pasta about once a week.
UPDATE (5/21/2017): We’ve learned a lot about making pasta over the years, including the exact ratio of flour to liquid: 5 parts flour (by weight) to 3 parts liquid (also by weight), plus a pinch of salt. So to make 8 ounces of perfect pasta dough you need 5 ounces flour (pretty much any kind) and 3 ounces of liquid (pretty much any kind). Now you might find some people who claim the ratio is 3 parts flour to 2 parts liquid. This ratio will result in a dough that is too soft and a bit sticky. Do not be fooled, we make pasta dough weekly and have tried many ratios before settling on the 5 to 3 ratio.
Basic Pasta Dough
Ingredients
- 150 g flour (1 slightly heaped cup)
- Pinch salt
- 10 g extra virgin olive oil (optional) (2 tsp)
- 50 g egg (optional) (1 large)
- 30 g Water (2 Tbs)
Instructions
- Measure out about a cup of flour into a bowl and add a pinch of salt.
- Use a fork to mix in the salt and make a small well in the center.
- Add the olive oil and the egg.
- Use your fork to lightly mix the egg and olive oil and gradually incorporate the flour.
- Start adding water, a tablespoon or two at a time, mixing to incorporate.
- On the counter, knead the dough at least 300 strokes; the dough will be smooth.
- Wrap in plastic, and place in the fridge for at least an hour.
- When your ready to roll and cut, warm the dough for an hour.
- Attach your pasta machine to the counter and lay out several clean dish towels.
- Adjust the pasta machine to the widest setting. Divide the dough into four pieces, and, working one piece at a time, run your dough through the pasta machine. Run the dough through, fold it in thirds, turn it 90°, and run it through again.
- Adjust your pasta machine to the next setting and run the dough through again. Lightly dust with flour if the dough wants to stick. Continue doing this until you have the dough as thin as you want.
- Run the pasta through the cutter and place the pasta on the towels to dry.
- Cooking the pasta. Basically, you boil up homemade pasta like any other pasta, except it cooks much faster.
Ingredient discussion:
Flour: We use unbleached all-purpose flour for making pasta. We don’t get all frou-frou and buy special pasta flour, or even an expensive all-purpose flour. We just don’t notice enough of a difference to justify the price differential, so we pick up 15-20 pounds of either Pillsbury or Gold Medal when it’s on sale and that’s that. If you want to try another flour, go for it.
Olive Oil: Sorry, but we do watch what olive oil we buy. Most EVOO isn’t, even major brand names, so be careful. You can check Truth in Olive Oil for more information. We happen to buy Queen Creek Olive Oil because it’s relatively local.
Eggs: For us, only true free range eggs will do. Free range tastes better. We happen to get our eggs from a local source we know. We’ve visited and found happy, healthy chickens scratching around in the dirt eating bugs and greens. Always remember: what’s good for the chickens is good for you.
Water: We use tap water.
Salt: For pasta we use regular old table salt. The small amount used is to prevent your pasta from tasting like paste.
Now, let’s talk about the recipe. Pasta is forgiving. Measurements don’t need to be exact, and ingredients are flexible. Don’t have/want the olive oil? Don’t put it in, or use some other light oil; traditional pasta recipes don’t call for it, but we think the dough is a bit easier to roll when it’s included. Don’t have/want to consume eggs? Don’t put them in; just use more water. The resulting pasta isn’t as rich, but it’ll still be great. In fact, the recipe we modified this from called for three eggs; it was too rich for us, so we go with one. If you have a pasta machine, great. It makes rolling and cutting pasta a breeze. If not, don’t fret; just roll out the dough as thin as you can with a rolling pin and slice into shapes with a sharp knife. We’ve done pasta both ways. If you’re thinking of getting a pasta machine, check the thrift stores. You can pick up nearly brand new machines really cheap (ours was $5.43 at Salvation Army).
Time: Start this early. No, you don’t have to slave away all day to make pasta. It has to rest a bit in the fridge. And rewarm to room temperature. And be rolled out. And cut. And dried a bit. Don’t panic. It sounds like a long process, but you’ll only spend 40 minutes of your time making the best pasta you’ve ever had.
Procedure in detail:
Note: You can make this in a mixer with a dough hook. It’ll be just as good, just don’t tell anyone; everyone wants hand-made pasta.

Check to make sure you have everything. Some people like to bring out all the ingredients and implements of creation before making a dish. We don’t; they get in the way, but we did it this time just so you could see them all in one place and at one time. You’re welcome.

Measure out about a cup of flour into a bowl. (If you look up other pasta recipes on the Internet, they say to measure it out on the counter — go ahead, if you want — we find the counter is a bit harder to clean than a mixing bowl, especially when the egg runs out of the flour onto the counter and dries a bit while we’re finishing the pasta. You might be more successful).

Add a pinch of salt — if you’re concerned about how much, measure out about 1/4 teaspoon — and toss it into the flour. But, really, unless you put in a lot of salt, it’ll be fine. If you want to use a fancy sea salt or kosher salt, feel free. Maybe you can taste the difference, but we doubt it. If you’re trying to restrict your intake of salt, use just a little, but I’d really suggest that you do use some.

Use a fork to mix in the salt and make a small well in the center. Okay, we didn’t really make much of a well. That’s okay, too. It’s mainly so the olive oil and egg won’t touch the edge of the bowl before mixing. Why? We don’t know, but it’s a traditional instruction. Maybe the authors are paid by the word.

Add the olive oil — We do this by eye — saves cleaning a measuring spoon, which saves us a good seven seconds during cleanup. Now, all we need to do is figure out what to do with those extra seven seconds. Any ideas?

Add the egg — We do this by eye, too — you could measure if you want, it weighs about 50 grams, but I’d suggest that you just go for it, grab an egg, crack it, and toss it in. If the yolk breaks, fine. If not, you’ll break it in the next step, anyway.

Use your fork to lightly mix the egg and olive oil and gradually incorporate the flour. With a single egg, there’s no way you’ll moisten all the flour. Not unless you used one heck of a large egg. Don’t fret, we’re almost there.

Start adding water, a tablespoon or two at a time. Part way through, you’ll have to switch to your hands to mix. Continue mixing and adding water until you have a semi-firm but pliable dough. You should be able to press your thumb into the dough without much effort. It also shouldn’t be sticky. What if you’ve added too much water? Don’t worry, just add a bit more flour; it’s only pasta science, not rocket science.

Dump it out onto the counter and start kneading. Knead the dough at least 300 strokes (we did 350, whoohoo). If you’re not sure how to knead dough, that’s okay; here’s how: grab the edge that’s furthest away from you with your left hand, press your right thumb into the center of the dough, and fold it over. Remove your right thumb, and press the dough down with the palm of your left hand. Give the dough a quarter turn. That’s one stroke. Now do it again. And again. And again …. If you’re left-handed, well, you’ll figure something out; you’re probably used to all instructions being written for righties, anyway.

Knead until the dough is smooth. You shouldn’t have lumps in the dough. It should feel like one homogenous piece of dough. To help you visualize what properly kneaded dough is like, imagine slicing into it. You wouldn’t have any bits of flour that weren’t incorporated, would you? If you’re unsure whether you’ve kneaded it enough, just knead it a bit longer. You’d have to be superman to hand-knead pasta dough too long. (If you’re using a mixer with a dough hook, about 5 minutes of kneading should do the trick).

Wrap in plastic, and place in the fridge for at least an hour. More’s okay, too. We plan on leaving it in for 4 hours before shaping. The dough needs to rest and relax. Really! The rest stage allows the gluten to relax and ensures that the moisture has migrated evenly through the dough. It will feel more supple once it comes out of the fridge for rolling and shaping.
Congratulations! We’ve made pasta dough. Pretty cool, huh? According to the timestamps on the photos, it took us a total of 14 minutes, start to finish, with photos. It also took about 10 minutes for cleanup, too, including some breakfast dishes, so we’ll put the time at about 20 minutes total — minus those seven seconds. Of course, we’re not quite through; we have to do something with the dough. That’s next.
Warm the dough for an hour. About an hour before you want to roll and cut the dough, take it out of the fridge and set it on the counter to warm. Leave it in the plastic wrap, and let it sit. Go back to whatever else you were doing. If you get distracted and come back in two hours, that’s okay. People have been making pasta for centuries, and if the timing were critical, we’d have heard.

Attach your pasta machine to the counter and lay out several clean dish towels. If you haven’t got a pasta machine, plan on rolling out the dough on a lightly-floured work surface. It’ll be a bit more work, and the pasta won’t be quite as uniform, but, as long as you’re close in keeping the same thickness, it’ll cook up fine. Just call it pasta rustico — makes it sound impressive and expensive.

Divide the dough into four pieces. And shape each one into something that looks like a rectangle. You don’t want to feed the dough through all at once. It’ll be trouble, and you don’t want trouble. If you’ve increased the size of the recipe, increase the number of pieces, too.

Run your dough through the pasta machine. Adjust the machine to the widest setting. Run the dough through, fold it in thirds, turn it 90°, and run it through again. This helps knead the dough. We find it also helps square off the dough so the finished pasta sheet is like a large rectangle.

Adjust your pasta machine to the next setting and run the dough through again. Lightly dust with flour if the dough wants to stick. Continue doing this until you have the dough as thin as you want. On ours, we go up to a setting of 4. Setting it to 5 makes for some really thin pasta (perfect for no-boil lasagna, though).

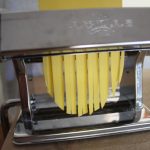
Run the pasta through the cutter. Unless you’re making lasagna, or ravioli, or some other shape that requires cutting by hand. You might have to dust the dough with a small amount of flour.

Place the pasta on the towels to dry. Separate the pieces if need be. Repeat with the remaining pieces of dough. Let the pasta dry for an hour or so. Clean up your machine and put it away.
Congratulations! You’ve made pasta. Even though I’ve made pasta several times, I’m still amazed by how much fun it is! To go from flour, egg, and a few other minor ingredients to one of the most-loved foods on the planet is just plain amazing. I’m always proud of the achievement, and you should be, too. Total time so far, about 40 minutes — minus the 7 seconds — including cleanup. Of course, we still have to cook the pasta, and that’s next.
Cooking the pasta. Basically, you boil up homemade pasta like any other pasta, except it cooks much faster. Depending on the thickness, it might take 2 minutes if it’s very thin, 5 minutes if it’s thicker. So check it often. Then drain the pasta into a colander to drain.
Enjoy! Serve with your favorite sauce. Sit up straight at the table knowing that you, yes, you, scratched up the pasta.
